Main Bedroom Project: The Reveal
Friends! The day has come! Our main bedroom is finally complete, well mostly! There are a few very very minor details that will be incorporated or worked in over time, but the overall space is DONE!
Before I get into all of the photos and goodies, I must extend my gratitude to a few folks who got me through this project. First, a big huge thanks to my husband LeStavion! This man was patient, loving, motivating, helpful, motivating and, did I say MOTIVATING?! He trusted me with the vision I had, for the space, he was open and considerate, and his input was invaluable! There were so many times when I would ask him “am I doing the most?” and he would reply “yes, but it’s damn good!” LeStavion is also a BRILLIANT licensed architect and damn good at what he does! Next, I’d like to thank… YOU! I received so much support from my community of friends especially on IG who cheered me on, engaged with me and provided encouragement, especially at the last leg as this project was wrapping up. Lastly, of course NONE of this is ever possible without my Creator! I’m just over here in awe of the gifts that have I have been blessed to share!
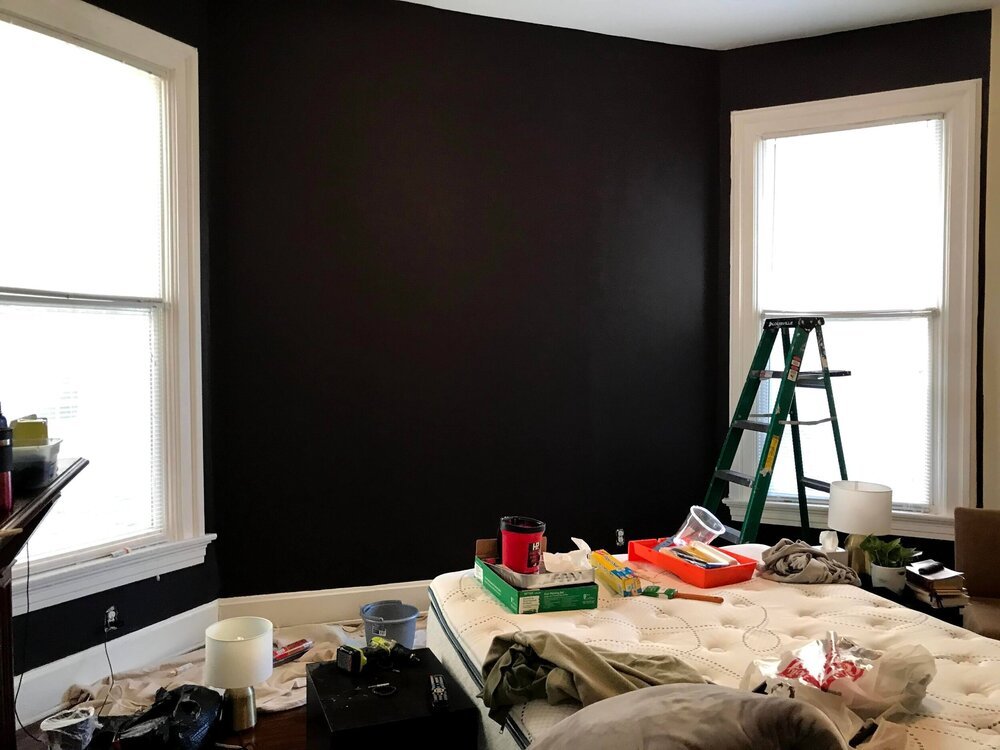
WHAT THINGS LOOKED LIKE BEFORE
So, let’s take a stroll down memory lane, mostly for you guys to see what this bedroom looked like before all of the glorious changes. If you missed out on the entire process, check out my IG highlights here and here and if you’re not already, be sure to follow me there on IG while you’re at it! Alright, so besides all the clothes on the bed and bench and overall mess, here is what our bedroom looked like before:


Here are a few shots of what the space looked like before we moved in:


THE CONCEPT
Besides all of the DIY, I wanted to treat this project as close to how I would a client project. With that said, I created a few concept boards, and LeStavion and I landed on this one below. We knew that we wanted the space to have some darker moody qualities, without sacrificing some lighter elements. We decided to work with rich colors like blues (which later got swapped for purples), deep yellows and greens, and needed incorporate this element of rhythm with fluted and repetitive elements.
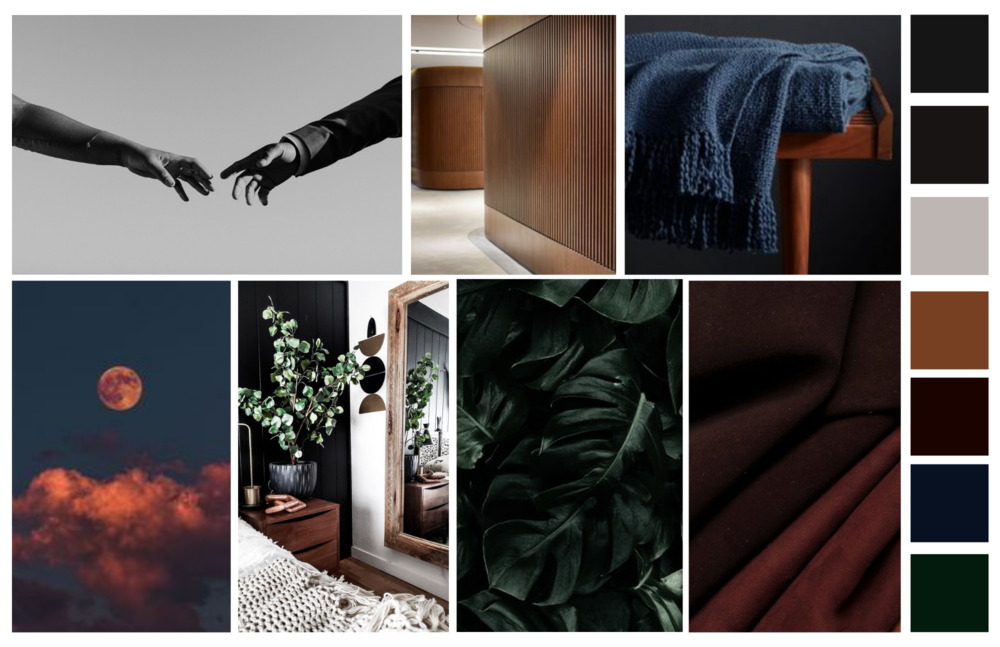
Concept Board
Let me share a bit of the process before I bombard you with all the fun “after” photos.
PAINT COLORS
The first thing that needed to be addressed was this awful paint color! Did I mention it’s throughout our entire house? Project by project, I am working to eliminate it. So, I wanted to tackle painting the entire room. Our ceilings are well over 11’ and if you remember from my previous blog post, our house was built in the late 1800s, so at this point, NOTHING is even, level, or straight. Hubs and I knew that we wanted a darker color for our feature wall and settled on Raisin by Shewrin-Williams. This is a chameleon color and looks darker or brighter/deeper depending on the lighting, but is the perfect purple color for the space. For the rest of the room, we decided to lighten and freshen it up a bit, painting the remaining walls Pure White by Sherwin-Williams.
Walls in Sherwin-Williams Raisin SW7630 (Emerald Flat)
FEATURE WALL
With the new dark paint color as my base, I wanted to add a feature wall that would be similar to an art installation, and that worked well with the tall ceiling and provided a nice detail with the varied lengths of our stained 1x2s. I sketched up the overall idea, size and flow of the feature and passed these drawings over to husbae to figure our the variation of the lengths. He used Rhino (a 3D modeling software) and Grasshopper (a computational design software) to get the varied look laid out, and I was able to select exactly how I wanted it to look from there. Although using these softwares isn’t necessary if you tackle this project yourself, it sped up time in calculating all the lengths of the 1x2 pieces we needed to cut. I painted the 1x2s Raisin and stained the other 1x2s. Since we do rent here and knew that we didn’t want to damage the walls with liquid nail adhesive and a ton of brad nails, we decided to install a 6’ tall by 8’ wide plywood base with which the 1x2s would be adhered to. Although our plywood base height was 6’, our purple 1x2 pieces were 7’ tall, so they hovered a foot over the top of the plywood base (yes, this was intentional). In the images below you can see how we started to get the pieces up and what it looked like once complete.


THE REVEAL
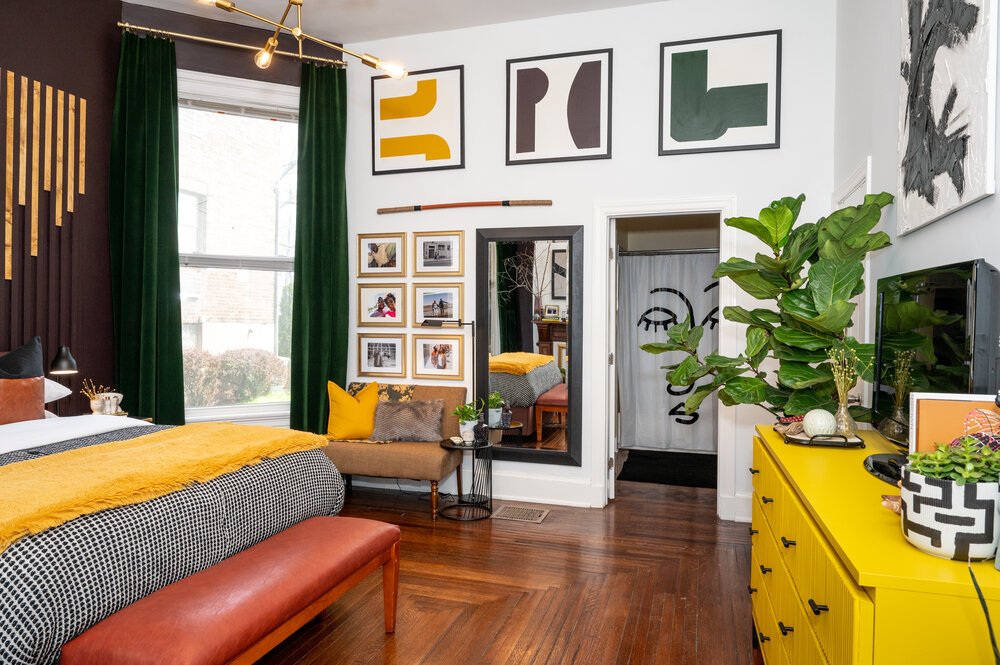
Here’s what we’ve all been waiting for!! The room in all it’s glory!
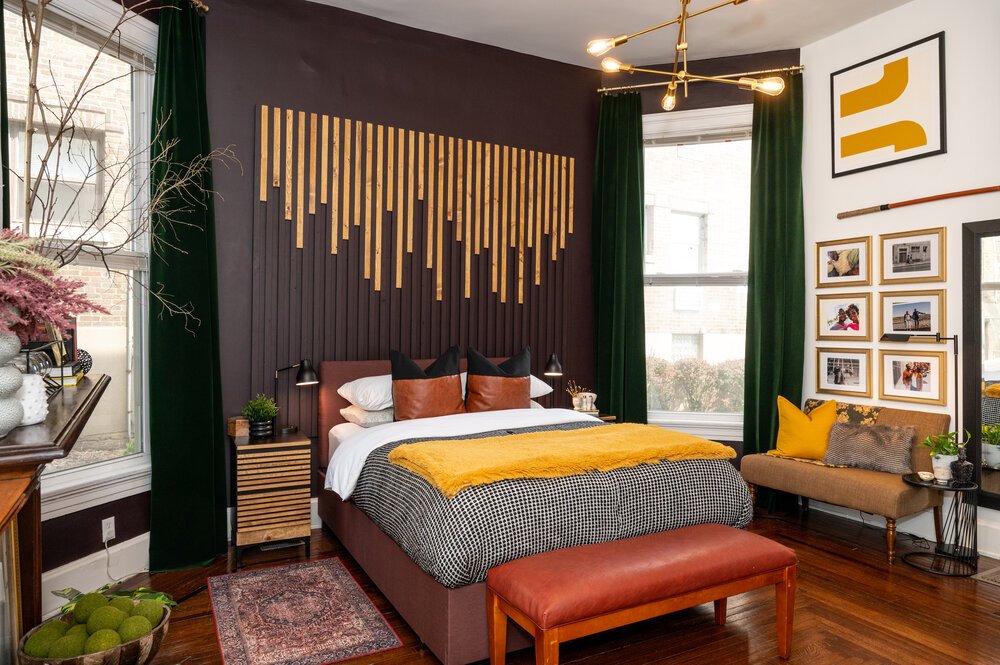
WHAT A DIFFERENCE, RIGHT!? Just scroll back up to the before images. We nailed our color scheme in here for sure! This main bedroom is kind of neutral in all the colors, but is deep and rich and comfortable!


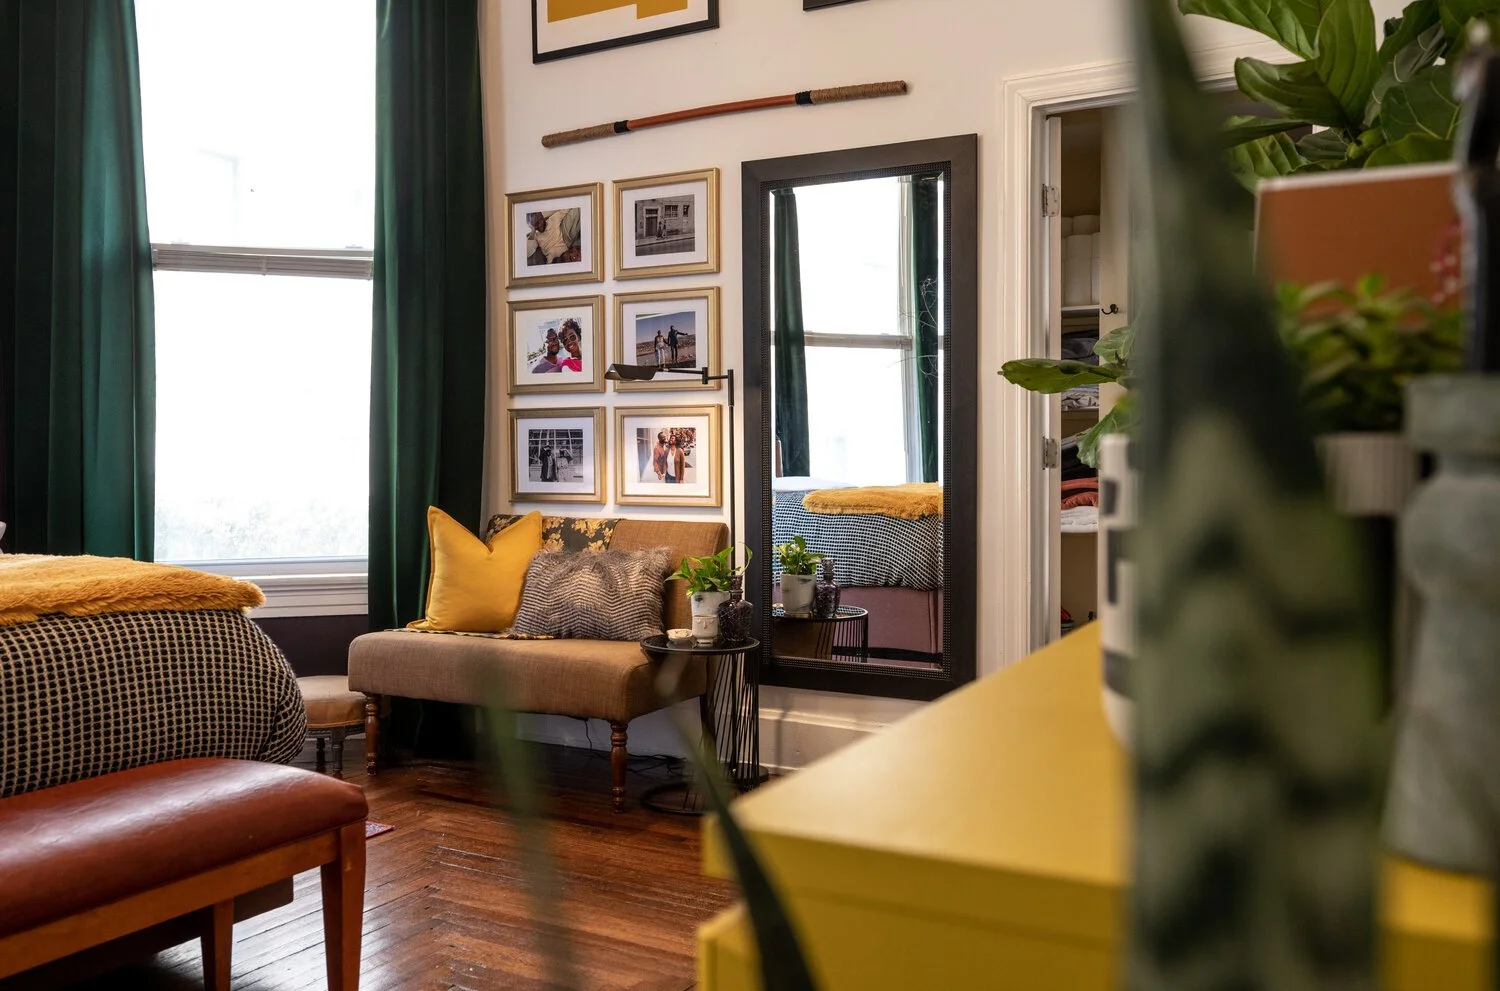
I knew I wanted to create a nice seating area that included a table for, let’s say a candle or two, coffee or an occasional cocktail. The gallery wall was another important element. We have great pictures of the two of us that we didn’t want to just live in our phones. I printed the photos and created a symmetrical gallery wall that fit perfectly in this space.

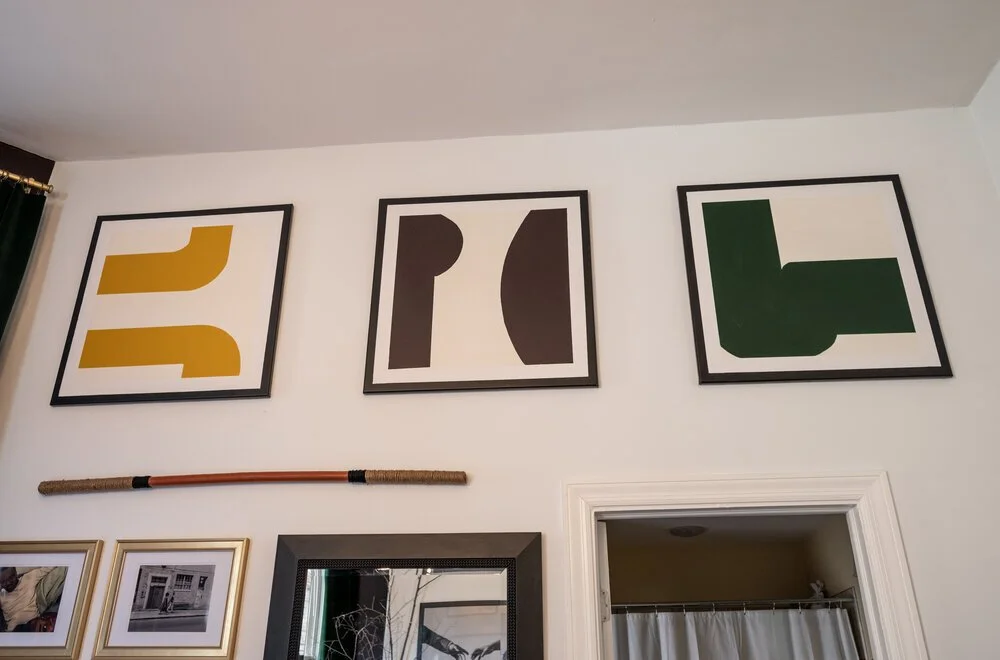
Since I do actually love our tall ceilings throughout the house, in our bedroom I still wanted to highlight the ceiling height by breaking the visual plane of the feature wall and the tops of the door trims. I created these three 30”x30” abstract art pieces in the colors that are present throughout the space. Although these pieces were painted on stretched canvas, I still created the framed look without having to frame them.
To make the room feel cozier on the dresser wall I created 2 large 36”x48” abstract art pieces. I wanted them to have some texture and have bold but abstract strokes in black.
DETAILS


One of the things we love in our bedroom are the hardwood floors. The pattern and detail are phenomenal and we knew we didn’t want to cover them up with an area rug for the sake of having an area rug. I opted instead for smaller rugs on both sides of our bed.

CHALLENGES
I don’t care how much of a novice designer, DIY-er or whatever you are. ALL projects are subject to challenges. I want to talk about just a few that I ran into or knew about going in. So, if you were following along this journey over on my IG, you heard me say over and over how uneven and unlevel our room is. The biggest challenges were how to make things appear straight and level and balanced in a space that was none of those things. I ran into a bit of a challenge with the curtains and curtain rod on LeStavion’s side of the bed. This area is where the dip in the room is most obvious. I had to hang the rod a bit uneven to make it appear straight, and had to cut my fabric for the curtain panels at different lengths to hit the floor evenly. Lastly, there is always the challenge of designing your own space. As a designer and architect duo, we had plenty of ideas for this space. It helped that we weren’t in a big rush, but did give ourselves a strict deadline to complete this project by the end of March. We got it done!
MORE PHOTOS!


WHERE TO FIND IT
Although I DIY’d majority of the furniture in the space, I’ve provided links to where similar items can be found. I have also provided links to other items that were purchased for the space.
Sputnik Light Fixture: here
Floor Lamp in Seating Area: here
Headboard and Bedframe: I DIY’d ours but here is a similar one here and here or here
Duvet Cover: here
Duvet Insert: here there is a really good cheaper option here
The key to a nice fluffy bed is to size up on your duvet insert (if your bed is a Queen get a King insert).
Pillows: here
Décor Pillows: here
Nightstands: I DIY’d ours and couldn’t find similar ones in style, but ours are Malm Ikea ones that we got from Facebook Marketplace
Dresser: I DIY’d ours but there is a similar one here or here and this one has a nice detail here
Fabric for Curtains: here
Curtain Clips: here
Settee: I got ours from Facebook Marketplace but there is a similar one here
Styling and Accessories: Mostly here
Professional Photography: here
If there is anything that I’ve missed or if you have any questions about ANYTHING please leave a comment! If you are in need of help solving your own design dilemmas or refreshing your space, give me a shout (you can use the same link if you absolutely KNOW you want to work with me, too!).
Love ya’ll!